Welcome to Istio Hands-On Pt 3!
Building on the foundation of Part 1, we’re excited to take you further into the exciting world of Istio Traffic Management! If you haven’t yet, make sure to check out the earlier session on setting up your Istio environment.
Below, you’ll find the table of contents detailing the Istio hands-on lab, organized into five informative sessions:
Today, we’ll master the following topics:
- Gateway
- Virtual Service
- Destination Rules
- Fault Injection
- Timeouts
- A/B Testing
- Circuit Breaking
- Retries
For this project, we are utilizing these github repositories:
Gateways
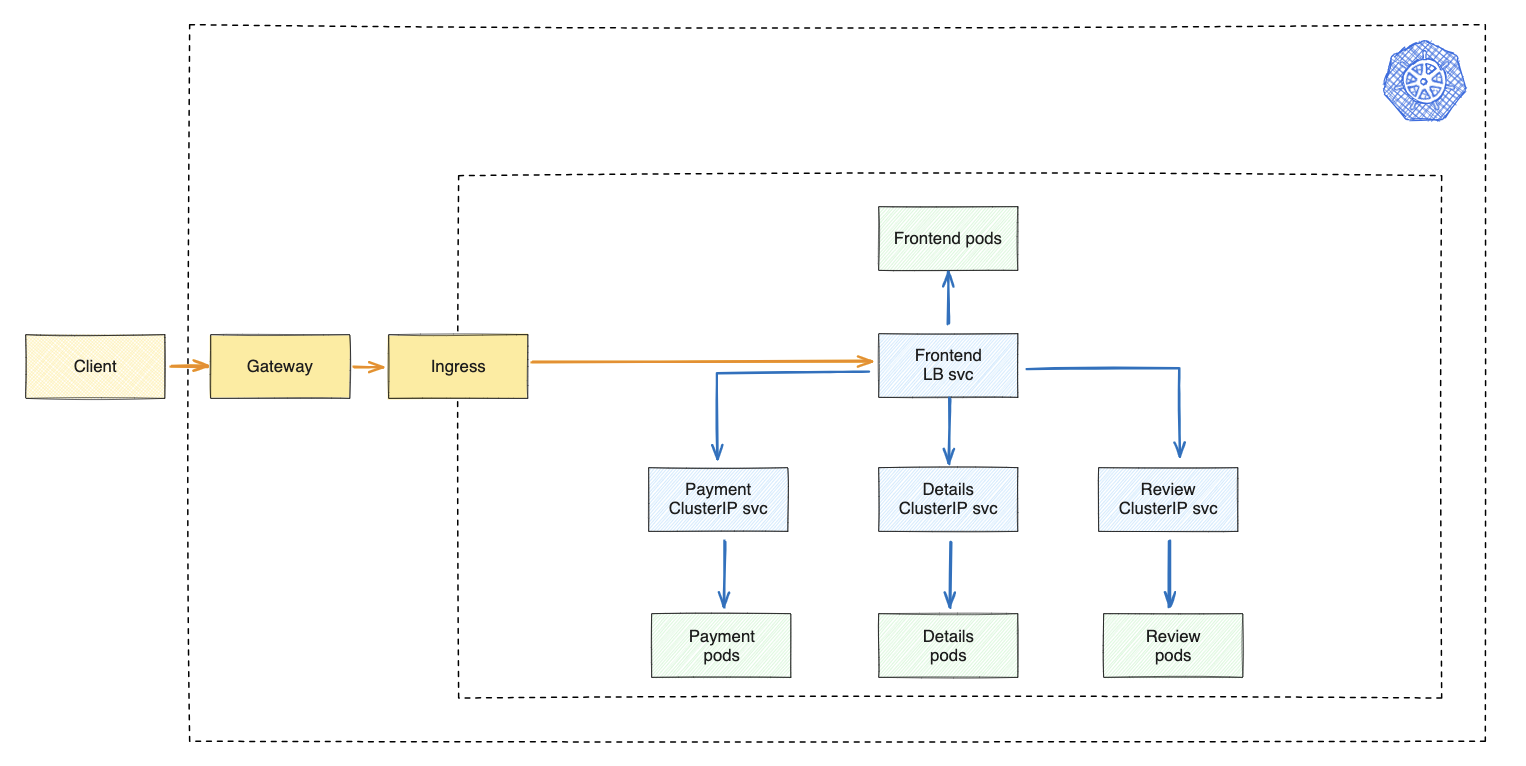
A Gateway is like a traffic controller for a service mesh. It sits at the edge, managing incoming and outgoing connections. Think of it as a set of instructions for how to handle different types of connections—what ports to use, what kind of rules to follow, and other details like how to configure the load balancer.
First, we deploy ingress rules to specify which path corresponds to each service. These rules essentially tell the system which service should be called when a specific path is accessed. Afterward, we deploy a gateway manifest, which is a set of instructions that defines the domain hosts we’ll be using to access the microservices website.
In simpler terms, it’s like setting up road signs. The ingress rules are like signposts that guide traffic to the right service based on the path taken, and the gateway manifest is like a big sign at the entrance, stating which domains are allowed to access our microservices website.
Dive deeper into gateway configuration specifics by visiting this comprehensive resource: link
Deploy Ingress Rules
# check svc
kubectl get svc -n istio-system | grep istio-ingressgateway

# deploy ingress
kubectl apply -f istio/traffic-management/istio-ingress.yaml

# verify
kubectl get ingress -A

# setup environment variables
export INGRESS_HOST=$(minikube ip)

export INGRESS_PORT=$(kubectl -n istio-system get svc istio-ingressgateway -o jsonpath='{.spec.ports[?(@.name=="http2")].nodePort}')

echo http://$INGRESS_HOST:$INGRESS_PORT/

# open the website (example)
open http://192.168.64.66:31586
open http://192.168.64.66:31586/details
open http://192.168.64.66:31586/payment
open http://192.168.64.66:31586/reviews
Deploy Gateway
# deploy gateway
kubectl apply -f istio/traffic-management/istio-gateway.yaml

# verify
kubectl get gateway -A

# test with sample DNS
curl -s -HHost:microservices-yuya.com http://$INGRESS_HOST:$INGRESS_PORT

# update local DNS
echo -e "$(minikube ip)\tmicroservices-yuya.com" | sudo tee -a /etc/hosts

# verify if the dns updated
cat /etc/hosts

open http://microservices-yuya.com:31586
open http://microservices-yuya.com:31586/details
open http://microservices-yuya.com:31586/payment
open http://microservices-yuya.com:31586/reviews
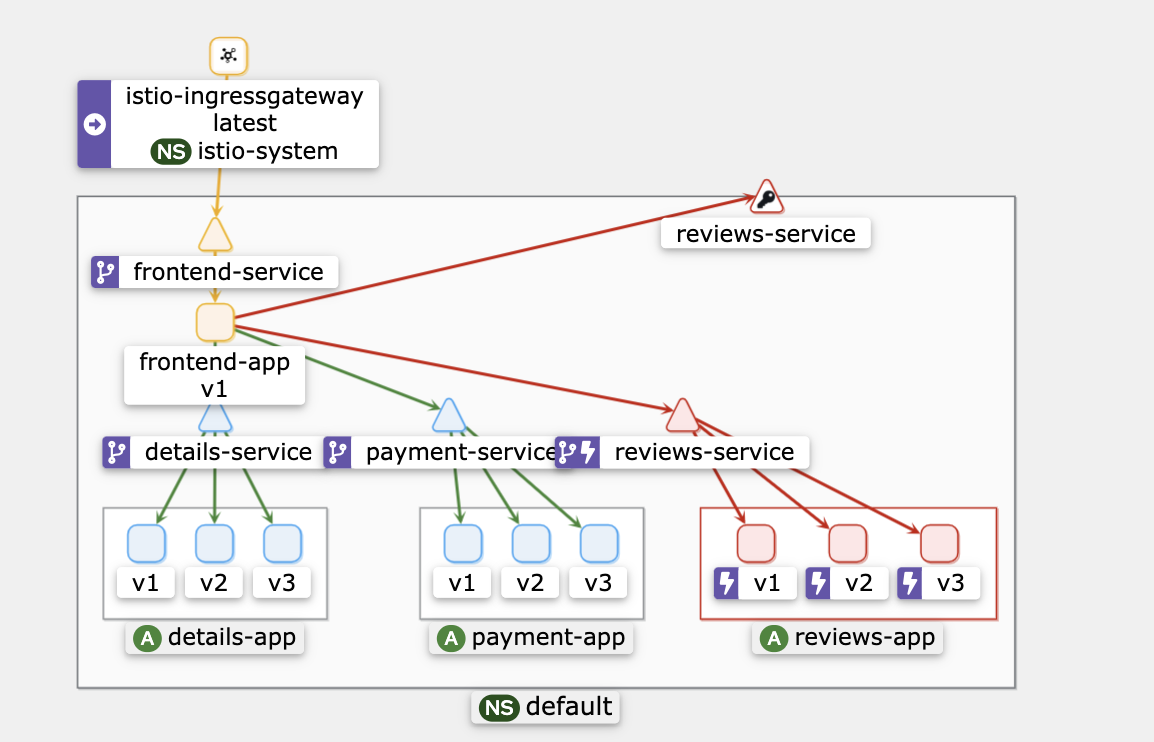
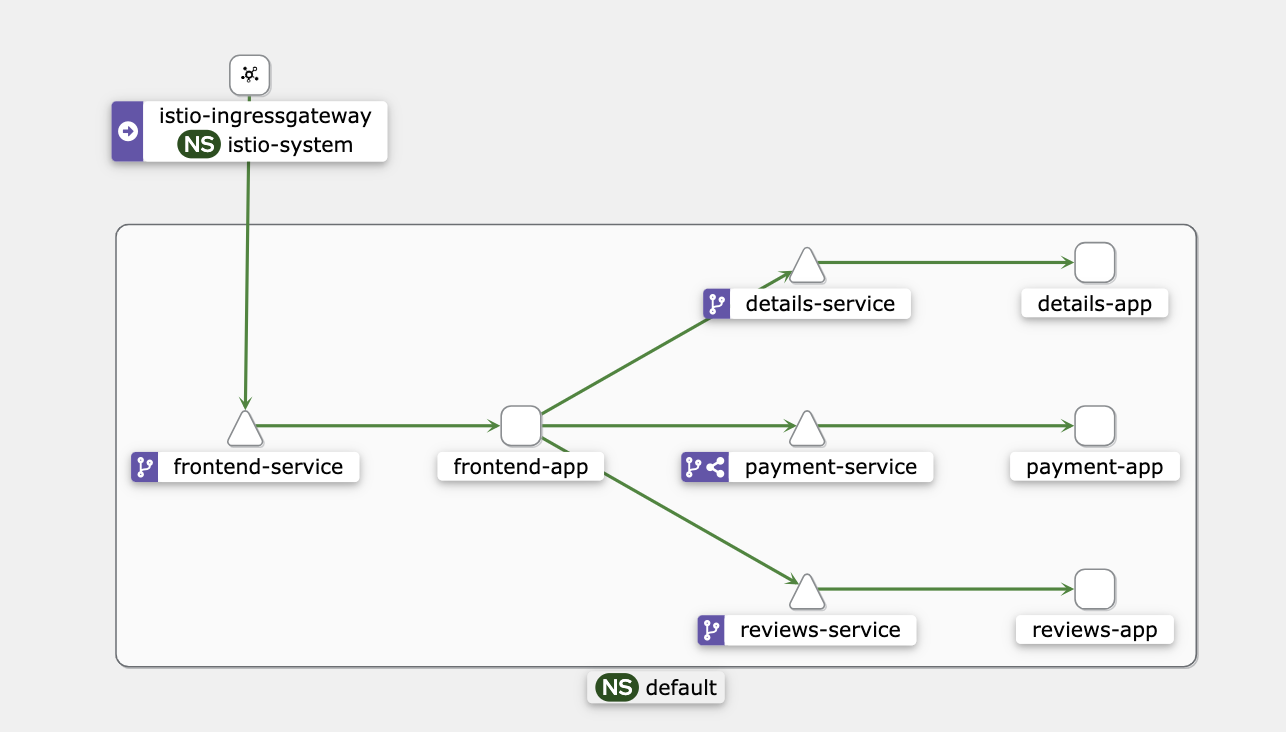 Upon successful deployment, we’ll see the newly added gateway component in the Kiali Graph.
Virtual Services and Destination Rules
Istio Virtual Services and Destination Rules are crucial components for traffic management within the Istio service mesh. They work together to define how incoming traffic is routed to specific versions of a service and how that traffic is handled by the service instances.
Virtual Service
A Virtual Service acts as the traffic routing engine, defining rules that map incoming requests to specific destinations within the mesh. Think of it as a traffic cop directing vehicles to their designated destinations based on certain criteria.
Destination Rule
A Destination Rule defines settings for how traffic is handled by the service instances after it has been routed by a Virtual Service. It essentially configures the “destination” side of the traffic flow.
Important !
The order of deploying destination rules before virtual service manifests is crucial because destination rules define the subsets and versions of a service, providing the necessary information for routing decisions. When we deploy a virtual service, it relies on the destination rules to determine how the traffic should be distributed among different subsets or versions of the service.
# deploy init config for virtual services
kubectl apply -f istio/traffic-management/virtual-service.yaml

# you can access another frontend pages now
open http://microservices-yuya.com:31586/health
open http://microservices-yuya.com:31586/login

# deploy destination rules
kubectl apply -f istio/traffic-management/destination-rules.yaml

# update traffic routing by the details app
kubectl apply -f istio/traffic-management/virtual-service-details.yaml
Fault Injection
Fault Injection allows us to intentionally introduce faults into our microservices environment to test and validate the resilience of our applications. By injecting faults, we simulate real-world scenarios where components of our system may fail, helping us identify weaknesses and potential points of failure.
Here are some reasons why fault injection in Istio is important:
- Resilience Testing
- Error Handling Verification
- Dependency Analysis
- Recovery Testing
- Security Validation
We can inject errors in our virtual services and these cloud be 2 diffrent types of error delays and aborts
Delays
Introduces artificial latency into requests, simulating issues like network congestion or slow upstream services. Useful for testing timeout handling, retry logic, and service behavior under degraded performance conditions.
Example: The reviews app has a delayed response (7s) from a database service.
# deploy fault injection
kubectl apply -f istio/traffic-management/virtual-service-fault-delay.yaml

# generate traffics
while sleep 0.5; do curl "http://microservices-yuya.com:31586"; done
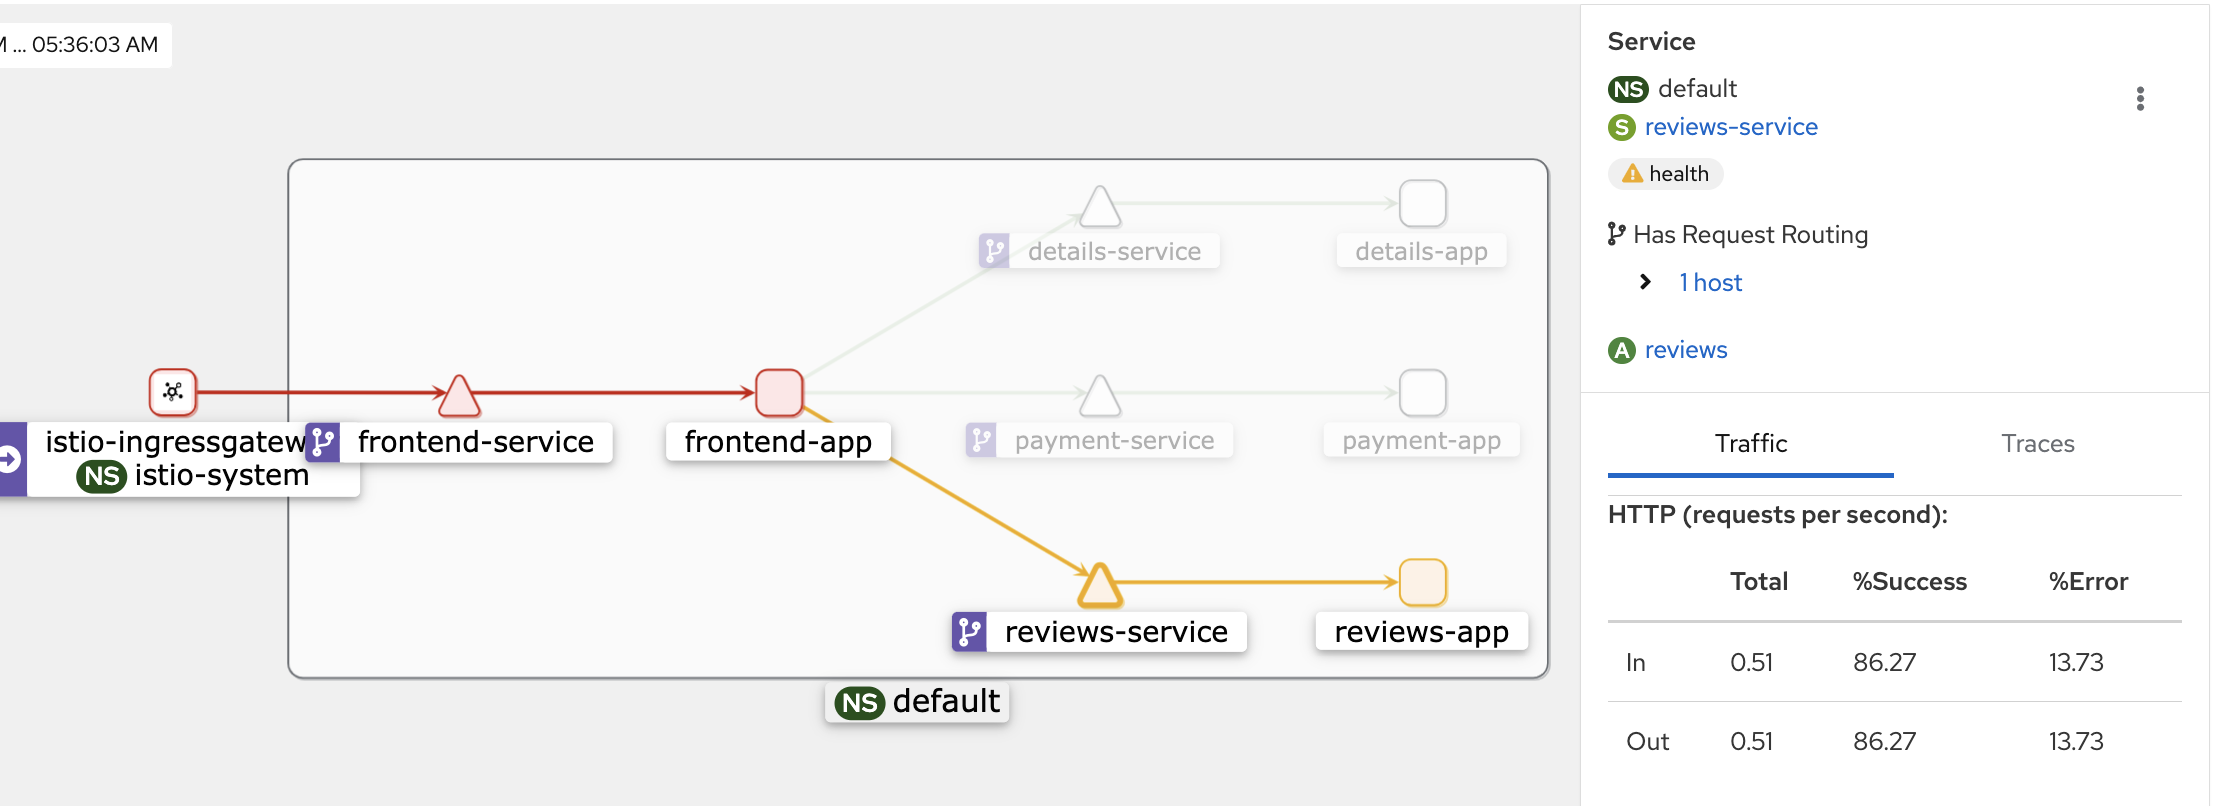 Now the frontend app is displaying an error response due to a 7-second delay in 80% of reviews version 1.
Aborts
Terminates requests prematurely, emulating errors such as network disconnections or service crashes. Helps evaluate how our services handle unexpected failures and recover gracefully.
Example: The reviews service responds with an unavailable 4xx error.
# deploy fault injection
kubectl apply -f istio/traffic-management/virtual-service-fault-abort.yaml

# generate traffics
while sleep 0.5; do curl "http://microservices-yuya.com:31586"; done
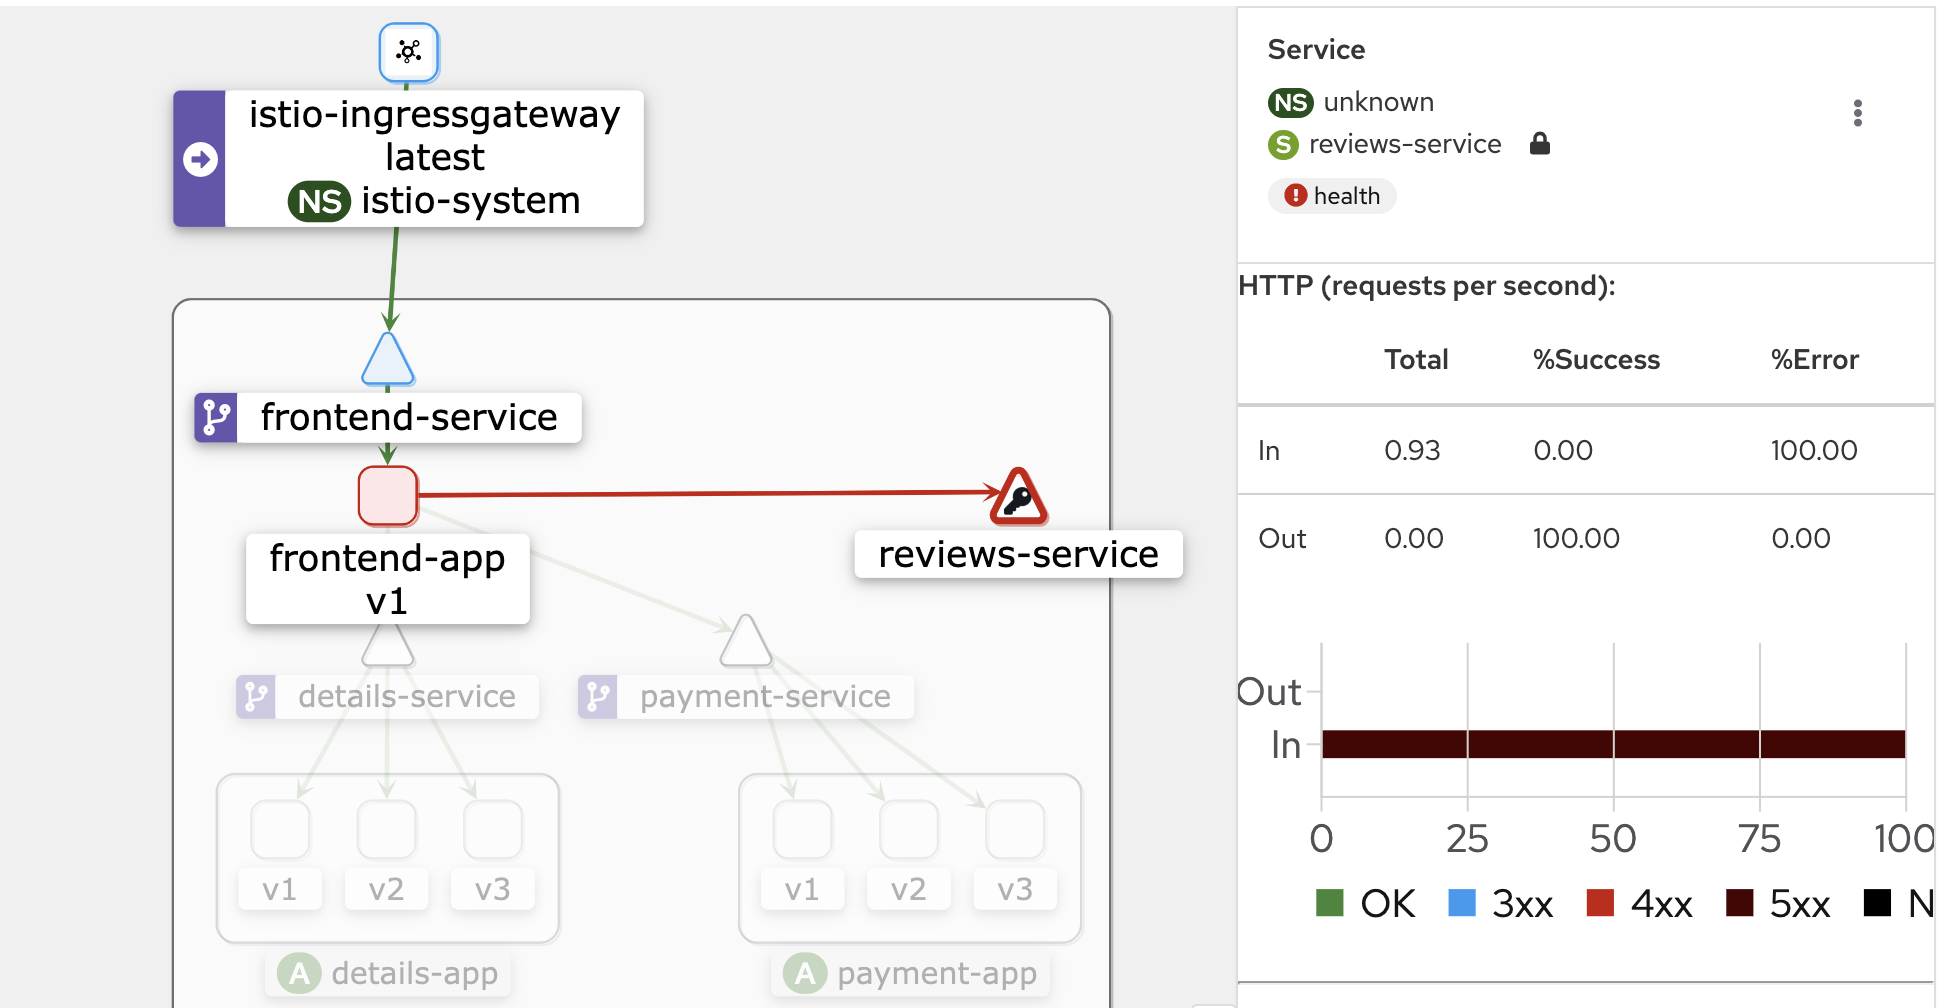 The frontend app is now showing an error response as a result of a 4xx error occurring in 100% of reviews version 1.
Timeouts
We can setup the maximum amount of time a client or downstream service is allowed to wait for a response from an upstream service. If the upstream service does not respond within the specified timeout duration, the request is considered timed out. They help prevent long waiting times for clients and avoid potential resource exhaustion due to hanging requests.
Example: The reviews app has a delayed response (7s) from a database service and we configure all services with a timeout of 3 sec.
# deploy fault injection
kubectl apply -f istio/traffic-management/virtual-service-fault-delay.yaml

# deploy timeouts
kubectl apply -f istio/traffic-management/virtual-service-timeouts.yaml

# generate traffics
while sleep 0.5; do curl "http://microservices-yuya.com:31586"; done
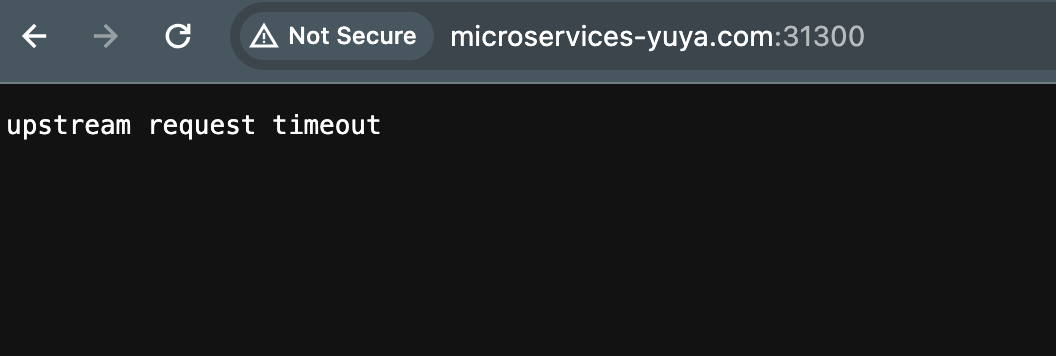 Currently, Istio is delivering the message to the client indicating an
 upstream request timeout message.
A/B Testing (Split testing)
In the context of our microservices architecture, we aim to compare the performance of two different versions of both the payment and reviews apps to determine which version delivers better results.
Deploying A/B Test for Payment App
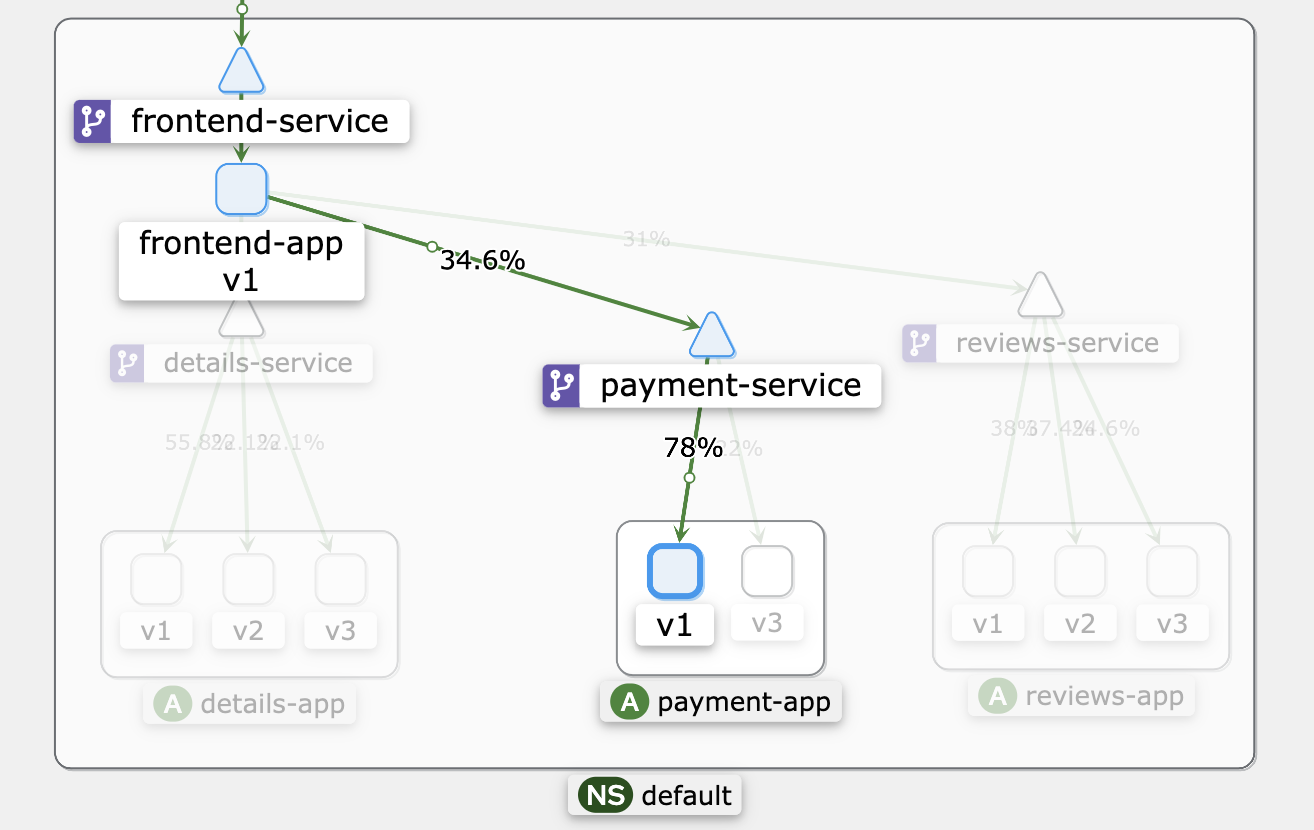
For the payment app, we implement A/B Testing by directing approximately 80% of the user traffic to version 1 and the remaining 20% to version 3. The following command utilizes Istio to apply the necessary virtual service configuration:
kubectl apply -f istio/traffic-management/virtual-service-payment.yaml
In the Kiali Graph, the distribution of traffic to version 1 can be observed, reflecting the successful implementation of the traffic-splitting strategy.
Deploy A/B Test for Reviews App
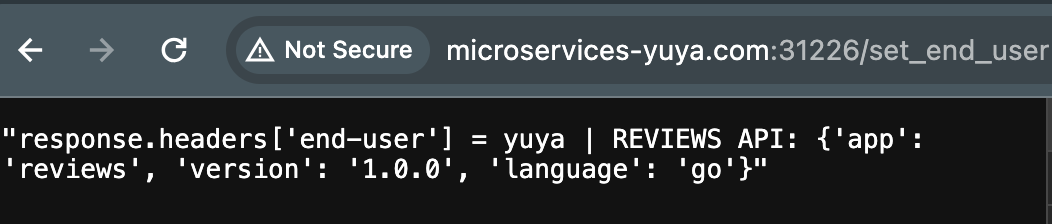
A more nuanced approach to A/B testing can be achieved by utilizing the match capability in the virtual service manifest. Specifically, we can activate a particular version based on specific scenarios. In this example, we introduce a scenario where the response header includes a variable called end-user under the URL path /login at http://microservices-yuya.com:31586.
...
spec:
  hosts:
  - frontend-service.default.svc.cluster.local
  http:
  - match:
    - uri:
        prefix: /set_end_user
    - headers:
        End-User:
          exact: yuya
    route:
    - destination:
        host: reviews-service.default.svc.cluster.local
        subset: v1
  - route:
    - destination:
        host: reviews-service.default.svc.cluster.local
        subset: v3
By executing the following command, we apply the Istio configuration for A/B testing in the reviews app:
kubectl apply -f istio/traffic-management/virtual-service-abtesting.yaml
Post-deployment, the frontend service will display version 1 only when the end-user is set to yuya; otherwise, it will default to version 3. This feature proves invaluable for testing developmental or Proof of Concept (PoC) versions.

Circuit Breaking
we can use circuit breaking configuration to prevent a system from making calls to our services that are likely to fail, thus avoiding degradation of the entire system’s performance due to prolonged and cascading failures.
Example: The reviews app occasionally experiences extended request times, causing cascading issues for all microservices.
Benchmark Test
We will employ a Python benchmark program to assess the efficiency, speed, and overall performance of our microservices. This tool allows users to specify the total number of requests and concurrent calls. The output provided to the user includes metrics such as the Success Rate, Failed Requests, Total Time, and Requests per Second (RPS).
Navigate to the workspace in order to execute the benchmark test.
cd tests/benchmark_tests
pip install -r requirements.txt
python main.py
We’ll test our microservices with 1000 requests and 10 concurrent connections.
Before Circuit-Breaking
Result
Enter the website URL: http://microservices-yuya.com:31586
Enter the total number of requests: 1000
Enter the number of concurrent calls: 10

Benchmark Summary for http://microservices-yuya.com:31586
Total Requests: 1000
Concurrent Calls: 10
Successful Requests: 1000
Failed Requests: 0
Total Time: 103.13 seconds
Requests per Second: 9.70
After a waiting time of 103.13 seconds, we finally received the result.
After Circuit-Breaking
Deploy the circuit-breaking for reviews app
kubectl apply -f istio/traffic-management/circuit-breaking.yaml
Verify the new configuration in Kiali

Result
Enter the website URL: http://microservices-yuya.com:31586
Enter the total number of requests: 1000
Enter the number of concurrent calls: 10

Benchmark Summary for http://microservices-yuya.com:31586
Total Requests: 1000
Concurrent Calls: 10
Successful Requests: 33
Failed Requests: 967
Total Time: 6.18 seconds
Requests per Second: 161.81
We received quick responses due to very strict circuit-breaking rules. Here are the benchmark results.
Retries
Istio is equipped with retry logic that includes a 25ms initial delay, followed by intervals after a 1-second failure, and a total of 2 retries before an error is returned.
Example: The maximum number of retries to 2 when calling reviews:v1 service, with a 1s timeout per retry attempt.
# deploy fault injection
kubectl apply -f istio/traffic-management/virtual-service-fault-delay.yaml

# deploy retries
kubectl apply -f istio/traffic-management/virtual-service-retries.yaml

# generate traffics
while sleep 0.5; do curl "http://microservices-yuya.com:31586"; done
Conclusion
In this session, we learned through hands-on exploration about advanced microservices optimization using Istio traffic management key features. This session went beyond theoretical knowledge, empowering developers, architects, and DevOps professionals with practical skills. I hope you enjoyed delving into and implementing these features. Feel free to revisit, and in our next session, we’ll explore the crucial topic of securing our service mesh.