Welcome to Istio Mastery Guide!
The CNCF announced that Istio now includes ambient mode as beta with the upcoming 1.22 version - Posted on March 19, 2024. You can read the full announcement Want to get deeper into Service Mesh with Istio? Head over to here. Want to get deeper into Service Mesh with Istio? Head over to the detailed announcement.
I asked what is the ambient mesh and wanted to know the logic, how does it work, and how to use it. Today we will deep dive into the world of sidecar-less service mesh with ambient mesh.
What is the Ambient Mesh?
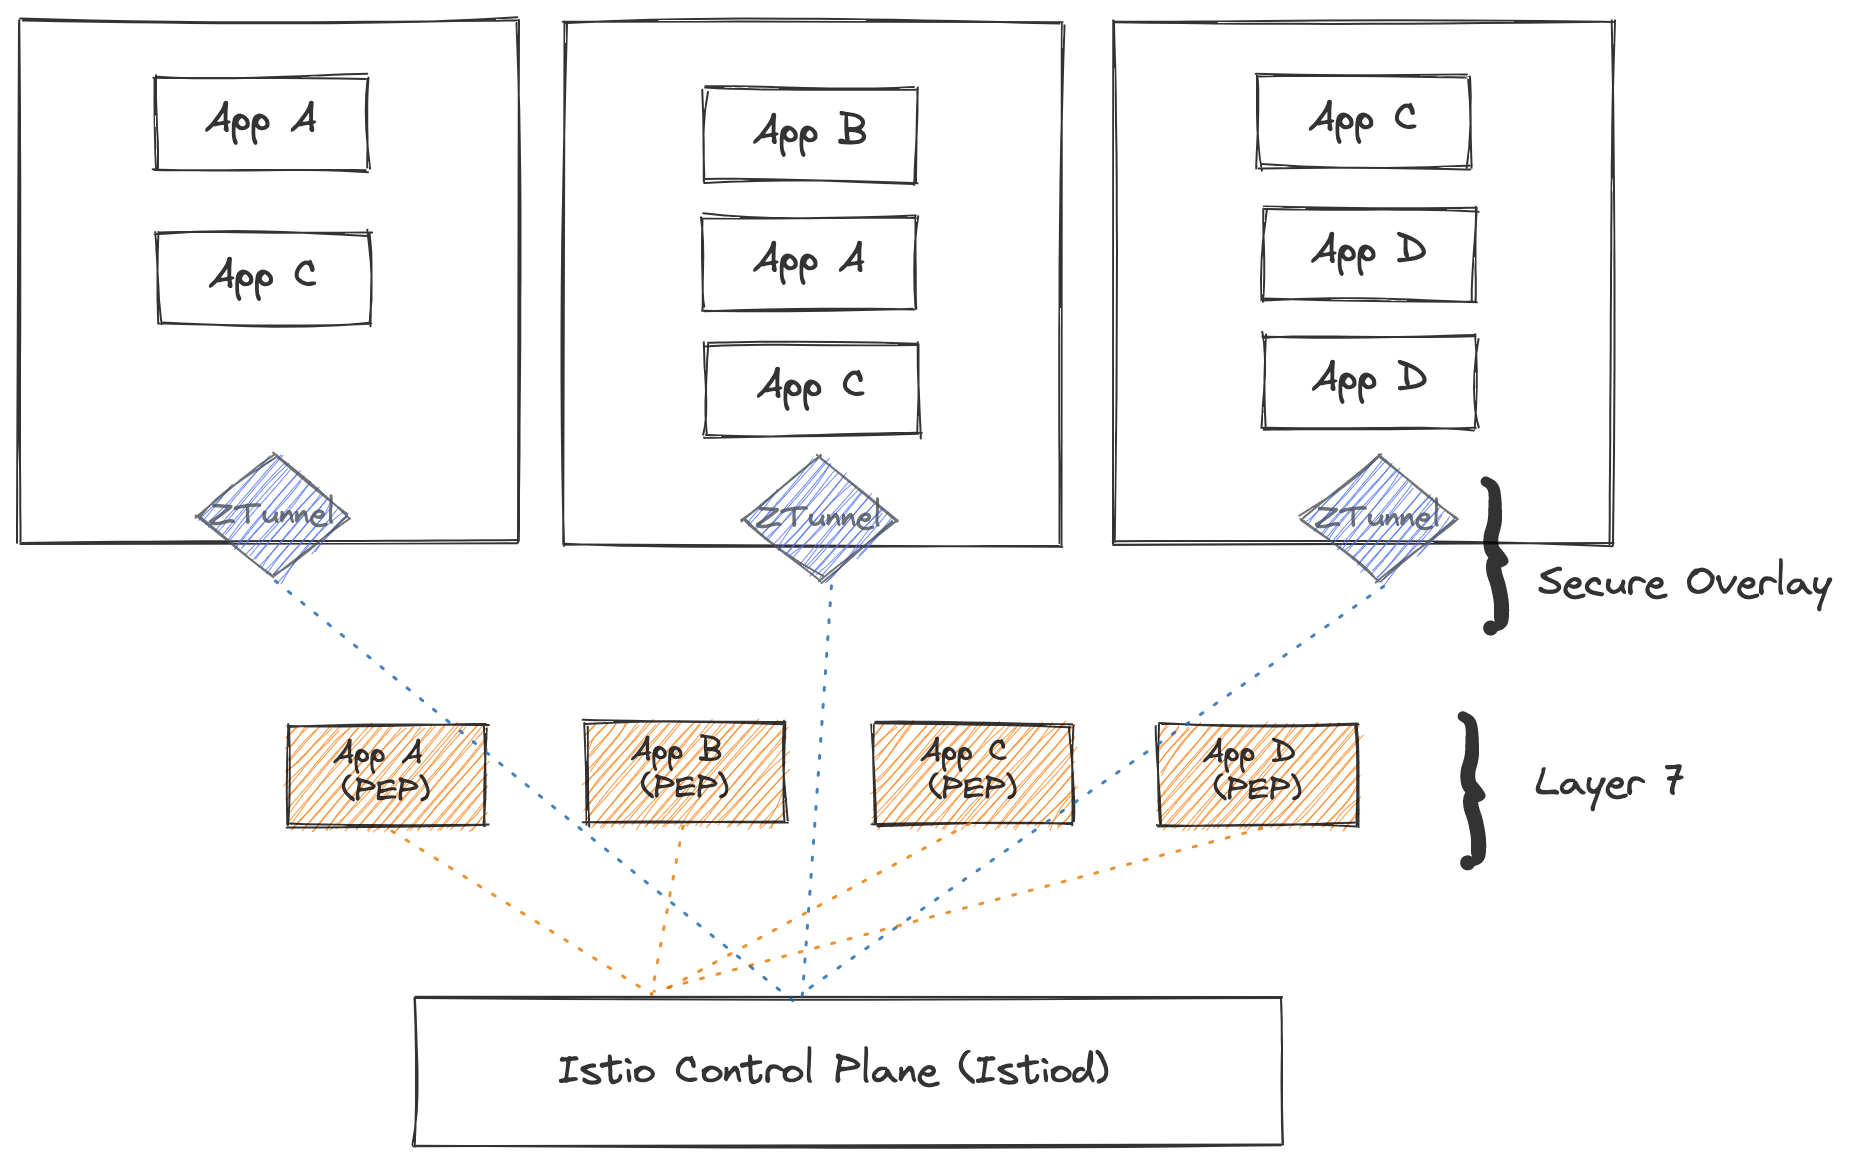
In ambient mode, Istio brings the Layer 4 features of the sidecar-less service mesh architecture to production readiness. This feature is used for a per-node L4 proxy, a lightweight node proxy called the ztunnel and optionally a per-namespace L7 proxy.
Why Ambient Mesh?
- Reduced Complexity: Simplifies application deployment by removing sidecars.
- Resource Efficiency: Reduces overhead by eliminating the need to overprovision memory and CPU.
- Improved Security: Offers zero-trust security with mutual TLS, enhanced metrics, and L4 authorization.
- Flexibility: Allows optional deployment of L7 proxies (waypoints) for advanced functions.
- Performance and Cost: Enhances performance and lowers infrastructure costs.
Performance Improvement
Consider managing 200 Pods, each with a 40MB sidecar. Switching to Ambient Mesh with 3 Nodes and 12 Waypoints results in significant savings.
Bofore:
- 200 Pods * 40Mb = 8GB
After:
- 3 Nodes * 15Mb per Ztunnel = 45Mb
- 12 Waypoint * 40Mb = 480Mb
- Total: 535MB instead of 8GB
This switch results in a 93.3% reduction in storage usage.
How does Istio Ambient Mesh work?
Ztunnel
The ztunnel (Zero Trust tunnel) is a lightweight, per-node proxy in Istio’s ambient mode. It securely connects and authenticates workloads within the mesh.
- Written in Rust: Handles L3 and L4 functions like mTLS, authentication, L4 authorization, and telemetry.
- Efficiency: Doesn’t process HTTP traffic or headers, focusing on secure L3/L4 transport.
- Secure Transport: Uses HBONE. (HTTP-based Overlay Network Environment) to tunnel traffic to waypoint proxies for advanced L7 features.
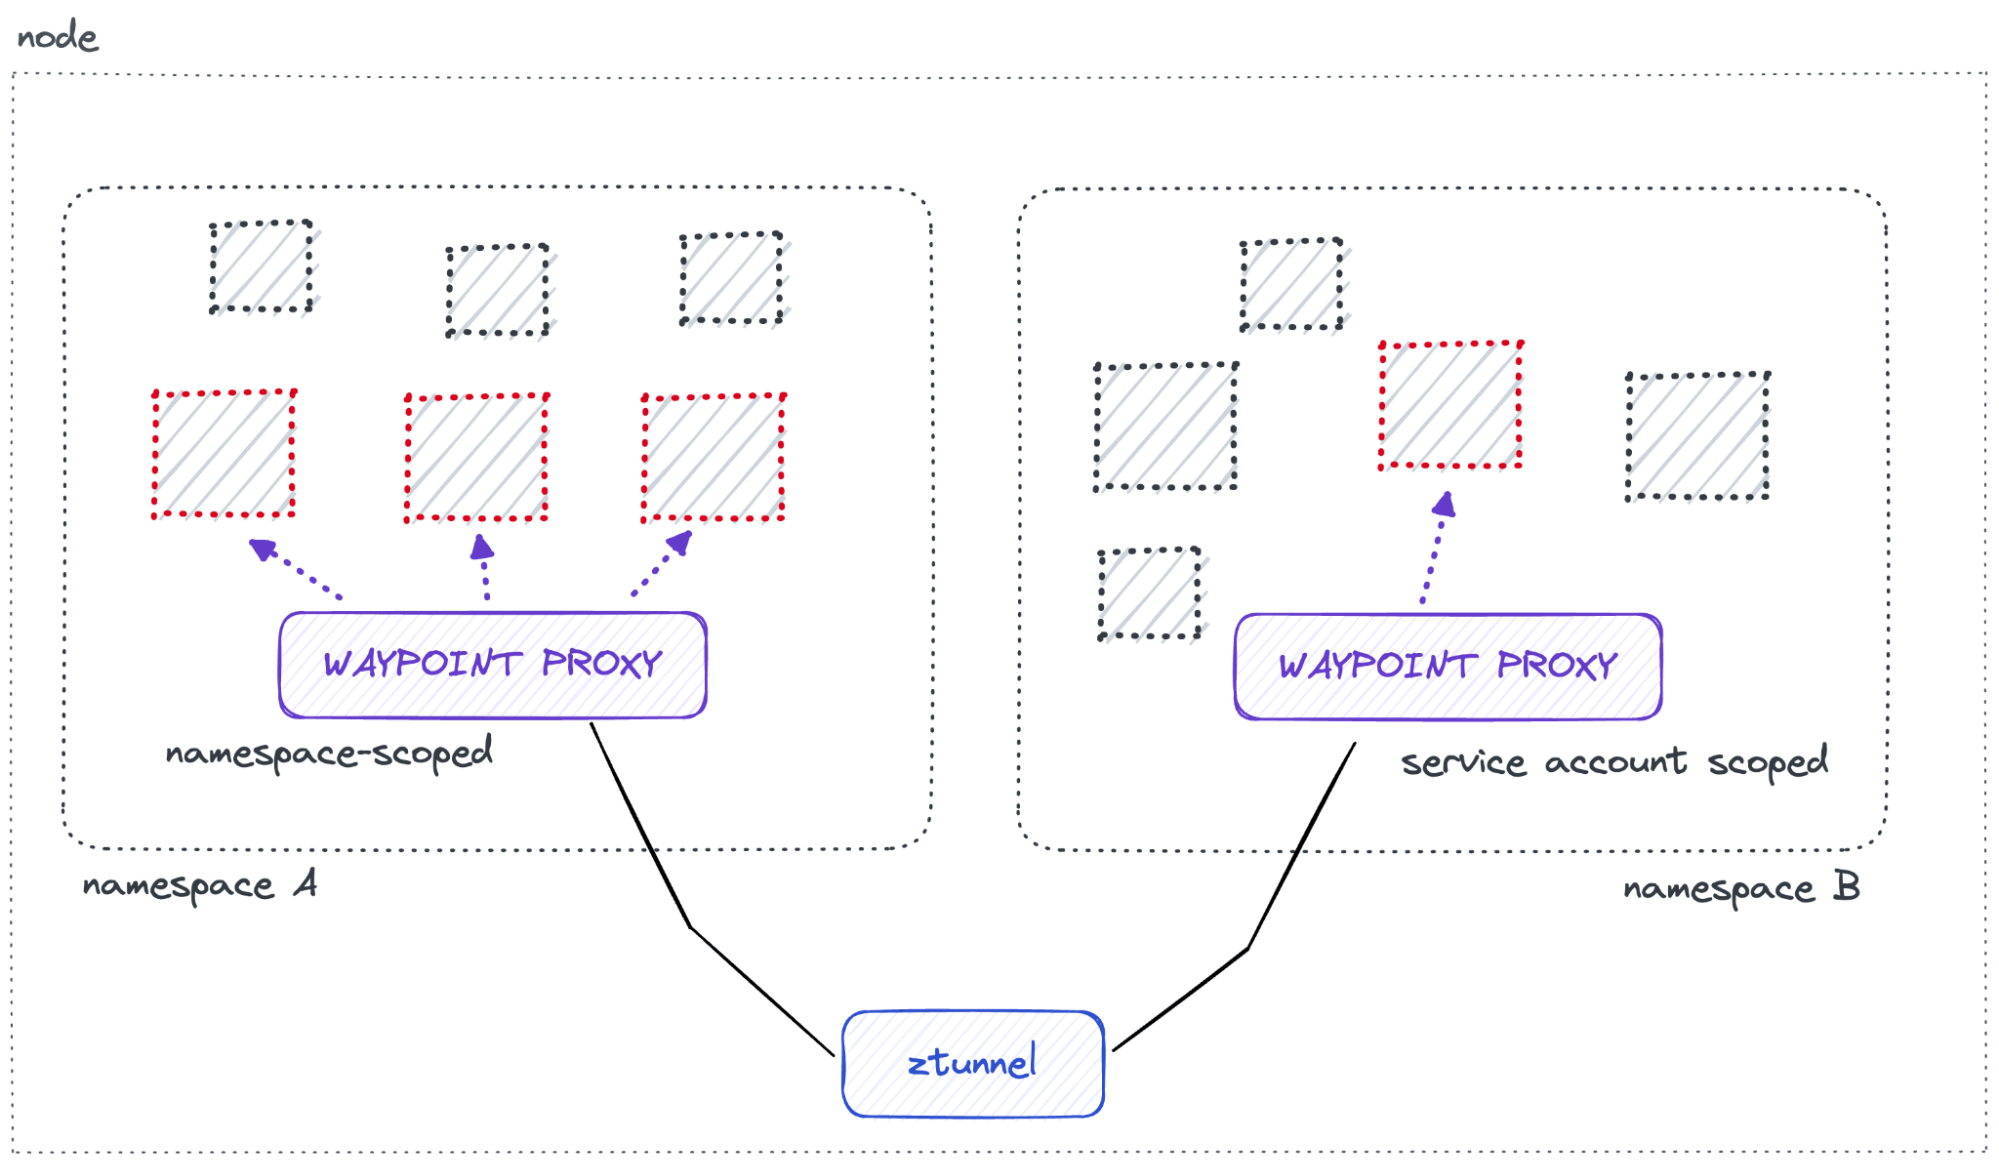
Waypoint proxies
Waypoint proxies use the Envoy proxy, which Istio also uses for sidecars. Similar to sidecars, waypoint proxies are dynamically configured by Istio to serve your application’s configuration.
Key Features
- Outside Application Pods: Waypoint proxies run separately from your application pods.
- Independent Management: They can be installed, upgraded, and scaled without affecting your applications, reducing operational costs.
- Flexible Deployment: Waypoint proxies can run per-namespace (default) or per-service account, providing flexibility in how they are used.
When to Use Waypoint Proxies
- L4 Use Cases: If you only need Layer 4 security features, you don’t need a waypoint proxy.
- Advanced Features: For advanced traffic management and Layer 7 features, you’ll need to deploy waypoint proxies.
How to Use Ambient Mesh?
- Download and install
- Deploy a sample application
- Test the bookinfo application
- Adding the application to the Ambient Mesh
- Set L4 authorization policy
- Set L7 authorization policy
- Change traffic routing
Download and install
# Install the Kubernetes Gateway API CRDs
kubectl get crd gateways.gateway.networking.k8s.io &> /dev/null || \
  { kubectl kustomize "github.com/kubernetes-sigs/gateway-api/config/crd/experimental?ref=v1.1.0" | kubectl apply -f -; }

# Install Istio with the ambient profile
istioctl install --set profile=ambient -y

# Verify the installed components
kubectl get pods,daemonset -n istio-system | grep ztunnel
kubectl get pods,daemonset -n istio-system | grep cni
⚠️ Make sure the default namespace does not include the label istio-injection=enabled when using ambient mode, because you do not need Istio to inject sidecars into application pods ⚠️
Deploy the sample application
# Deploy the sample services
kubectl apply -f k8s/service-mesh/bookinfo

# Deploy the sleep app for the traffic test
kubectl apply -f k8s/service-mesh/sample

# Set the environment variables for the Kubernetes Gateway
export GATEWAY_NAME=bookinfo-gateway
export GATEWAY_HOST=$GATEWAY_NAME-istio.default
export GATEWAY_SERVICE_ACCOUNT=ns/default/sa/$GATEWAY_NAME-istio

# By default, Istio creates a LoadBalancer service for a gateway. Change the service type to ClusterIP by annotating the gateway.

kubectl annotate gateway $GATEWAY_NAME networking.istio.io/service-type=ClusterIP --namespace=default

# Check Gateway configuration
kubectl wait --for=condition=programmed gtw/$GATEWAY_NAME
Test your bookinfo application. It should work with and without the gateway
# access with sleep app
kubectl exec deploy/sleep -- curl -s "http://$GATEWAY_HOST/productpage" | grep -o "<title>.*</title>"

# access with sleep app
kubectl exec deploy/sleep -- curl -s http://productpage:9080/ | grep -o "<title>.*</title>"

# access with nosleep app
kubectl exec deploy/notsleep -- curl -s http://productpage:9080/ | grep -o "<title>.*</title>"
Adding your application to the ambient mesh
# You can enable all pods in a given namespace to be part of an ambient mesh
kubectl label namespace default istio.io/dataplane-mode=ambient
L4 authorization policy
Update AuthZ policy
kubectl apply -f - <<EOF
apiVersion: security.istio.io/v1beta1
kind: AuthorizationPolicy
metadata:
  name: productpage-viewer
  namespace: default
spec:
  selector:
    matchLabels:
      app: productpage
  action: ALLOW
  rules:
  - from:
    - source:
        principals:
        - cluster.local/ns/default/sa/sleep
        - cluster.local/$GATEWAY_SERVICE_ACCOUNT
EOF


# this should succeed
kubectl exec deploy/sleep -- curl -s http://productpage:9080/ | grep -o "<title>.*</title>"

# this should fail with a connection reset error code 56
kubectl exec deploy/notsleep -- curl -s http://productpage:9080/ | grep -o "<title>.*</title>"
L7 authorization policy
# deploy waypoint proxy
istioctl x waypoint apply --enroll-namespace --wait

# verify
kubectl get gtw waypoint

# update AuthZ policy
kubectl apply -f - <<EOF
apiVersion: security.istio.io/v1beta1
kind: AuthorizationPolicy
metadata:
  name: productpage-viewer
  namespace: default
spec:
  targetRefs:
  - kind: Service
    group: ""
    name: productpage
  action: ALLOW
  rules:
  - from:
    - source:
        principals:
        - cluster.local/ns/default/sa/sleep
    to:
    - operation:
        methods: ["GET"]
EOF

# confirm
# this should fail with an RBAC error because it is not a GET operation
kubectl exec deploy/sleep -- curl -s "http://productpage:9080/productpage" -X DELETE

# this should fail with an RBAC error because the identity is not allowed
kubectl exec deploy/notsleep -- curl -s http://productpage:9080/

# this should continue to work
kubectl exec deploy/sleep -- curl -s http://productpage:9080/ | grep -o "<title>.*</title>"
Update Traffic routing
# check the review version
count=10
for i in $(seq $count); do
    kubectl exec deploy/sleep -- curl -s "http://$GATEWAY_HOST/productpage" | grep "<u>"
done

# update traffic routing
kubectl apply -f k8s/service-mesh/demo/route-reviews-90-10.yaml

# check the review version

for i in $(seq $count); do
    kubectl exec deploy/sleep -- curl -s "http://$GATEWAY_HOST/productpage" | grep "<u>"
done
Conclusion
Ambient Mesh in Istio simplifies the service mesh architecture by removing sidecars, reducing complexity, and improving efficiency. With Istio’s ambient mode, you can enhance the security, performance, and manageability of your microservices environment. I personally found it incredibly easy and fast to set up the service mesh using Ztunnel. Enjoy building a robust service mesh. Cheers!